The Steam Deck has taken the gaming world by storm, offering a portable yet powerful way to enjoy PC games on the go. As gamers dive into this handheld marvel, curiosity about its inner workings grows. A teardown reveals not just the hardware but also the engineering brilliance behind this device.
Exploring the Steam Deck’s components uncovers a blend of cutting-edge technology and thoughtful design. From the custom AMD APU to the intricate cooling system, each part plays a crucial role in delivering an exceptional gaming experience. Understanding these elements not only highlights the innovation involved but also empowers users to make informed decisions about upgrades and repairs.
Overview of the Steam Deck Teardown
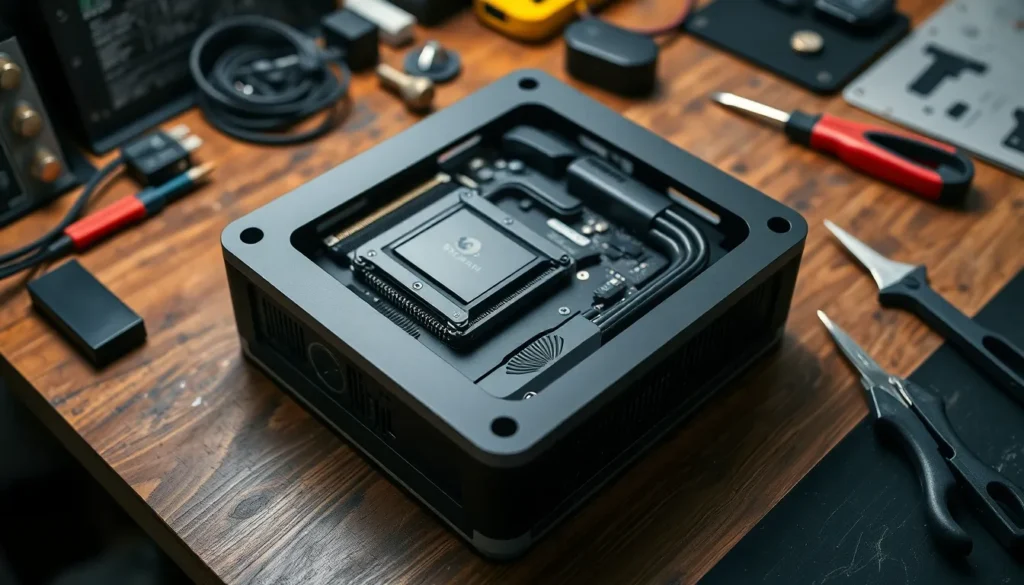
The Steam Deck teardown reveals crucial insights into its internal architecture. This examination discloses the arrangement and integration of various components. Users gain a deeper understanding of how these elements contribute to overall performance.
Key Components
- Custom AMD APU: The 8-core Zen 2 processor offers exceptional processing power. Coupled with RDNA 2 architecture, it enhances graphics performance for demanding games.
- Cooling System: The advanced cooling solution employs a vapor chamber design. This system efficiently dissipates heat, ensuring sustained performance during extended gaming sessions.
- Memory and Storage: The device includes 16 GB of LPDDR5 RAM, optimizing multitasking capabilities. Storage options vary from 64 GB eMMC to 512 GB NVMe SSD, accommodating different user needs.
Assembly Process
- Ease of Disassembly: The Steam Deck features accessible screws and panels, facilitating repairs and upgrades. This design minimizes the need for specialized tools.
- Modular Design: Components like the battery and SSD are modular, allowing for quick replacements. This feature caters to tech-savvy users who prefer customization.
Insights for Users
Understanding the internal layout helps users troubleshoot issues effectively. Knowledge about component accessibility promotes informed decisions for upgrades or repairs. Familiarity with the teardown process enhances the overall user experience.
Initial Impressions

The Steam Deck impresses with its robust design and engineering, evident from the teardown process. Users gain a deeper understanding of how the components contribute to an immersive gaming experience.
Design and Build Quality
The Steam Deck features a solid construction, employing high-quality materials that withstand daily use. The device’s ergonomic shape promotes comfortable handling during long gaming sessions. The overall aesthetic balances functionality and style, catering to a wide range of gamers. Notably, the button layout and thumbsticks provide intuitive controls, enhancing gameplay fluidity. Fasteners securing the chassis reveal a well-thought-out assembly, ensuring that the device remains sturdy while maintaining easy access for future modifications.
Accessibility for Repairs
The Steam Deck emphasizes user-friendliness in its design, allowing for simple repairs and upgrades. Accessible screws and removable panels streamline the disassembly process, eliminating the need for specialized tools. Component modularity, such as the easily replaceable battery and SSD, reinforces this accessibility, enabling users to customize their device quickly. This thoughtful engineering significantly reduces downtime during repairs, making the Steam Deck an appealing option for tech enthusiasts who prefer to maintain or enhance their devices independently.
Disassembly Process
Disassembling the Steam Deck requires specific tools and a clear step-by-step approach. Following these guidelines ensures a successful teardown without damaging components.
Tools Required
- Small Phillips Screwdriver: Use for loosening screws while minimizing potential stripping.
- Plastic Pry Tool: Handy for gently opening panels without scratching the surface.
- Tweezers: Effective for handling small screws and connectors during disassembly.
- Anti-Static Wrist Strap: Prevents static electricity damage to sensitive electronic components.
Step-By-Step Guide
- Power Down: Ensure the Steam Deck is completely off and unplugged from any power source.
- Remove the Rear Cover: Employ a small Phillips screwdriver to remove the screws securing the rear cover. Carefully use the plastic pry tool to separate the cover from the device’s body.
- Disconnect the Battery: Locate the battery connector and gently lift it using tweezers to avoid any damage. This step ensures safety during further disassembly.
- Detach the Cooling System: Unscrew the cooling assembly, including the fan and heat sink. Remove carefully to access the APU underneath.
- Access the APU: After removing the cooling system, the custom AMD APU is visible. Take care not to touch any exposed circuitry.
- Remove RAM and SSD: Unscrew the brackets holding the RAM and SSD in place. Lift them out gently; these components are modular and designed for easy replacement.
- Reassemble: After completing upgrades, reinstall components in reverse order. Ensure all screws are secure and the battery connector is reattached properly.
Following this guide facilitates a smooth disassembly process, promoting a better understanding of the Steam Deck’s internal workings and aiding future repairs or upgrades.
Internal Components
The internal components of the Steam Deck reveal a well-engineered architecture designed for optimal gaming performance. Each part plays a crucial role in delivering a high-quality user experience.
Hardware Specifications
The Steam Deck’s core hardware consists of several key specifications that enhance its gaming capabilities. The custom AMD APU combines an 8-core Zen 2 CPU and RDNA 2 architecture for powerful processing and graphics performance. This setup supports a wide range of games with smooth frame rates.
The device includes:
- RAM: 16 GB of LPDDR5, providing fast data access and multitasking capabilities.
- Storage Options: Choices include 64 GB eMMC and 512 GB NVMe SSD, catering to different user preferences for speed and capacity.
- Display: A 7-inch LCD touchscreen with a resolution of 1280×800 ensures vibrant visuals for immersive gaming.
These specifications create a versatile gaming platform suitable for various titles, from indie games to major AAA releases.
Cooling System Analysis
The cooling system in the Steam Deck incorporates advanced technology to maintain optimal thermal performance during extended gaming sessions. It features a vapor chamber design, allowing for efficient heat dissipation. By distributing heat evenly across the device, this cooling solution prevents overheating and ensures that performance remains consistent.
Key aspects of the cooling system include:
- Dual Fans: Two axial fans draw in cool air while expelling warm air, providing necessary airflow to maintain low temperatures.
- Heat Pipes: Implemented within the vapor chamber, heat pipes transfer heat away from the AMD APU and other components, enhancing cooling efficiency.
This precise thermal management not only prolongs device longevity but also improves overall gaming performance, making the Steam Deck an appealing choice for enthusiasts.
Reassembly Considerations
Reassembling the Steam Deck requires attention to detail to maintain its performance and integrity. Following certain guidelines can ensure a successful reassembly process.
Common Mistakes to Avoid
- Forgetting screws: Missing screws can lead to loose components, causing performance issues.
- Incorrectly connecting cables: Misaligned cables may prevent the device from powering on.
- Neglecting to ground oneself: Failing to use an anti-static wrist strap increases the risk of static damage to sensitive parts.
- Rushing the process: Hurrying can result in damages, such as cracking plastic clips or stripping screws.
- Overlooking the cooling system: Not reattaching the cooling system properly can lead to overheating during operation.
Final Thoughts on Reassembly
Reassembly of the Steam Deck emphasizes accuracy and care. Ensuring each component fits securely prevents future issues. Following the original teardown process in reverse while double-checking connections contributes to a functional and reliable device.
The Steam Deck’s teardown reveals a well-crafted device that balances power and portability. With its advanced cooling system and modular components, users can easily explore upgrades and repairs. This accessibility is a significant advantage for gamers who want to tailor their experience.
Understanding the internal architecture not only enhances troubleshooting skills but also empowers users to maintain their device effectively. The thoughtful design and high-quality materials ensure durability while providing an immersive gaming experience. As the Steam Deck continues to evolve, its user-friendly features and robust performance will likely keep it at the forefront of portable gaming technology.